Free Scarf Pattern – Time is Running Out!

You are almost out of time! You only have until midnight Friday, September 25th to claim the Unforgettable Keyhole Scarf pattern.

I Like Crochet is offering my blog readers the Unforgettable Keyhole Scarf pattern, designed by Kristi Simpson, for FREE for a VERY limited time!

Unforgettable-Keyhole-Scarf

And, of course while your visiting I Like to Crochet, feel free to subscribe!

Free Scarf Pattern – Limited Time Only

I Like Crochet is offering my blog readers the Unforgettable Keyhole Scarf pattern, designed by Kristi Simpson, for FREE for a VERY limited time!  You only have until midnight, this Friday, September 25, 2015 to claim this free pattern.  This scarf is made in one of my very favorite yarns — Red Heart Unforgettable!  Click HERE to claim the free pattern.

Unforgettable-Keyhole-Scarf

And, of course while your visiting I Like to Crochet, feel free to subscribe!

Candy Corn Scarf- Free Pattern

I had some yarn left over from making a candy corn hat and thought it would be fun to make a candy corn scarf.  I’m sharing the pattern for free with my readers.  I hope you enjoy it!

Candy Cane Scarf Main

Candy Corn Scarf
Designed by Carrie Carpenter

Yarn:  Caron United worsted weight yarn (4 oz/235yds/113g per skein):  1 skein each #6001 White (A), #6010 Orange (B), and 6011 Mustard

Materials:  US Size J (6.0mm) crochet hook, yarn needle, scissors

Difficulty:  Easy

Measurements:  6 ½” wide x 74” long (not including tassels)

Gauge:  Not critical for this project

Stitch Guide:  ch(s) – chain(s), sc – single crochet, dc – double crochet, st(s) – stitch(es),  DC3TOG –double crochet 3 together

Notes:  Scarf is made by working 4 rows in A, 4 rows in B, and 3 rows in C.

For a shorter or longer scarf, make beginning chain in multiples of 14 sts plus 4.


Instructions:

With A, ch 242

Row 1:  1 dc in 4th ch from hook, 1 dc in each of the next 5 ch, DC3TOG over next 3 chs, 1 dc in each of the next 5 ch, *(dc, ch 1, dc) in next ch, 1 dc in each of the next 5 ch, DC3TOG over next 3 chs, 1 dc in each of the next 5 ch; repeat from * across to last 2 chs, dc in each of the last 2 chs, turn. —15 (dc, ch 1, dc), 17 3DC TOG.

Row 2:  Ch 3 (counts as dc), 1 dc in first dc, 1 dc in each of the next 5 dc, DC3TOG over next 3 dc, 1 dc in each of the next 5 dc, * (dc, ch 1, dc) in next dc, 1 dc in each of the next 5 dc, DC3TOG over next 3 dc, 1 dc in each of the next 5 dc; repeat from * across to last 2 sts,  dc in each of the last  2 sts, turn. —15 (dc, ch 1, dc), 17 3DC TOG.

Row 3-4:  Repeat row 2, changing to B at the end of row 4.

Rows 5-8: Repeat row 2 using B, changing to C at the end of row 8.

Rows 9-11: Repeat row 2 using C. Fasten off.

Finishing:  Cut 9 strands each of A, B, and C approximately 15” long. Hold all strands together and fold in half forming a loop at folded end. At end of scarf, fold corners of scarf towards center creating 3 layers, draw loop of strands through all three layers of scarf, thread ends of strands through loop and pull to tighten and secure. Trim ends evenly. Repeat to attach another tassel to other end of scarf. Using yarn needle, weave in all ends.

Candy Cane Scarf - 4

Free Knit and Crochet Patterns for Newborns in Need

The latest issues of Knit 1-2-3 and Crochet 1-2-3 are out and the featured charitable organization is Newborns in Need.  Newborns is Need provides some of the basic necessities to mothers who need a helping hand.

You can find my designs for security blankets in each of these issues.  You can also get the patterns for free on line.  Just click on the captions about the images below to be taken to the free on line pattern.

Quick ‘n Simple Wooby

crochet pattern

12-22c_005


Baby’s First Security Blanket

knit pattern

12-22k_004

Sonesta Hat Band / Necklace

The Sonesta Hat Band is another pattern that I designed when I worked for Caron and it was on their blog (which is no longer), so I am now offering the pattern here for free.  Sadly, the NaturallyCaron Spa yarn that the pattern was made in has been discontinued, but the pattern could be made in most any yarn you choose.

The nice thing about this design is that it also doubles as a necklace. And if you wanted, make it a longer and use it as a belt!

FINISHED MEASUREMENTS:

Completed Hat Band Measures 1” wide x 23” in circumference

MATERIALS:

  • Naturally Caron.com SPA (75% Microdenier Acrylic/25% Rayon from bamboo; 3oz/85g, 251yds/230m): #0007 Naturally: 1 skein  (will make approximately 3 hatbands)
  • One size US D-3 (3.25mm), or size to obtain gauge.
  • 7   8mm round beads of choice for center of flowers – Approximately 56 #8 -#10 size beads
  • Yarn needle

GAUGE: 1 motif = 1.5” x 1.5” (prior to blocking)

STITCHES USED: Chain (ch), single crochet (sc), double crochet (dc), FPdc (FPdc), Slip Stitch (sl st)

NOTE:  This pattern is written for a hat with a 23” circumference brim.  For larger or smaller hats, simply make more or less motifs to fit.

DIRECTIONS (Make 14)

Ch 6, sc in first ch.

Round 1 (RS): ch 6( counts as 1dc and 3 ch), [3dc in ring, 3ch] 3 times, 2 dc in ring, sl st to 3rd of 6 ch, sl st in next 2 ch.

Round 2: 3 ch (counts as 1 dc), 2dc in same sp, * 1 FPdc around each of the next 3 st, 3 dc in next corner sp, rep from * twice more, 1 FPdc around each of the next 3 st, sl st to top of ch 3.  Fasten off.

FINISHING

Block motifs prior to sewing. Block each motif to 1.5” x 1.75”.  Sew motifs end to end using yarn needle and matching yarn.  To sew together, line up the motifs evenly and place 3 stitches (using each of the 3 FPdc as a guide for each stitch.) Using yarn needle, weave in all ends. Block lightly, if desired. Using single strand of yarn in same color, sew beads on as pictured.

Download PDF file of the pattern here:  Sonesta Hat Band _ Necklace _ hooked-on-crafting

P1170769

Spring is Almost Here!

We can wish, right? 🙂  Spring

Actually, I’m finally getting around to posting some more patterns that got lost in the abyss when the old Caron blog got removed.   All patterns here Simply Soft Party yarn, which  I really like better than other yarns with a metallic strand incorporated into it.  Simply Soft Party yarn has the metallic strand twisted into the yarn in a much better manner so the hook never seems to get caught on the strand like it does with other yarns, yet the yarn still maintains the softness it is known for.

I used my favorite Simply Soft Party color (Yes, Spring), to make these quick ornaments.  I made a small shamrock that can be used for just about anything- a pin, a pencil topper, a headband, etc- an all-around great St. Patty’s day embellishment. If you prefer the real luck of the Irish, then how about a 4 leaf clover?

Using the Embellish Knit, I made a cozy for a pencil by just knitting the length of the pencil and inserting the pencil into the tube (a sharpened pencil works best). The really fun thing about this cozy is that you can twist it in different directions on the pencil and get a really interesting textured effect. To top the pencil cozy off, I added a little flower done in Spring and Snow.  Or try knitting around a chenille stem and see what you can come up with. I coiled one around a chopstick and then added beads for embellishment.  I bent another into the shape of a shamrock.  If you want to make any of the projects pictured, my instructions are below.

Happy Oh, How I Wish It Was Almost Spring!

MATERIALS: 

  • Caron International’s Simply Soft Party (99% Acrylic, 1% Metallic): small amounts  #0003 Spring Sparkle (A), #0001 Snow Sparkle (B)
  • One size US H-8 (5mm) crochet hook, or size to obtain gauge.
  • One size US H-F (3.75mm) crochet hook, or size to obtain gauge.
  • Embellish Knit (to make Pencil Cover and Pencil Coil)
  • Yarn needle
  • Chenille Stems (for Pencil Coil)
  • Pencil
  • Beads

290

SMALL SHAMROCK:

With F-5 crochet hook ch 5. Slip stitch in 1st ch, ch 4, sl st in same sp (1st ch), ch 4, sl st in same sp (1st ch).

Sc in 1st 4 ch sp, *[hdc, 3 dc, sc, 3dc, hdc, sc] in same ch 4 sp, sl st in center, sc in next ch 4 sp, repeat from * 2 more times.

Stem: Ch 7, sc in 2nd chain from hook, 2 sc in next ch from hook, sc in each remaining ch, sl st in center of clover. Bind off. Weave in ends.

FOR A LARGER SHAMROCK:

With H-8 crochet hook, ch 6. Slip stitch in 1st ch, ch 5, sl st in same sp (1st ch), ch 5, sl st in same sp (1st ch).

Sc in 1st 5 ch sp, *[hdc, 3 dc, sc, 3dc, hdc, sc] in same ch 5 sp, sl st in center, sc in next ch 5 sp, repeat from * for this and 3rd ch 5 sp.

Stem: Ch 8, sc in 2nd chain from hook, 2 sc in next ch from hook, sc in each remaining ch, sl st in center of clover.  Bind off. Weave in ends.

LUCKY 4-LEAF CLOVER

With F-5 crochet hook, ch 5. Slip stitch in 1st ch, ch 4, sl st in same sp (1st ch), ch 4, sl st in same sp (1st ch).

Sc in 1st 4 ch sp, *[hdc, 3 dc, sc, 3dc, hdc, sc] in same ch 4 sp, sl st in center, sc in next ch 4 sp, repeat from * 3 more times.

Stem: Ch 7, sc in 2nd chain from hook, 2 sc in next ch from hook, sc in each remaining ch, sl st in center of clover. Bind off. Weave in ends.

FLOWER

With F-5 crochet hook, ch 5, slip stitch in 1st ch, ch1.

Round 1: 5 sc in ring, sl st to 1st sc, switch to B, ch 1.294

Round 2: With B, ch 3, dc in same sp, dc in next sc, sl st in next st, repeat from * around 4 more times.

Bind off. Weave in ends.


PENCIL COVER

Using the Embellish Knit, knit a cord the length of pencil.  Insert pencil into center of cord allowing tip to come out the other end. Bind off at top of pencil.  Make small clover and attach to top.  Weave in any ends.

CHOPSTICK  COIL

Using the Embellish Knit, start knitting a cord.  Insert a chenille stem into the center of cord and continue knitting the cord until the chenille stem is entirely covered.  Bind of end.  Coil around pencil.  Add desired embellishments, such as beads. Weave in any ends.

EMBELLISH KNIT SHAMROCK

Using the Embellish Knit, start knitting a cord.  Insert a chenille stem into the center of cord and continue knitting the cord until the chenille stem is entirely covered.  Bind of end.  Bend into desired shape working from the center of the cord so that the ends can be twisted together.  With a yarn needle, stitch together.   Weave in any ends.

288

Project Linus Pattern – Remake (FREE PATTERN!)

This is a design I did for Crochet 1-2-3 for their For the Cause feature in issue 5 about Project Linus:

Image

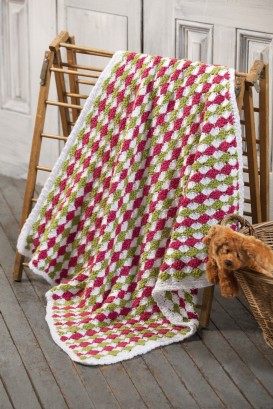
Wanting to make a gift for someone who has a baby (it’s a boy!) on the way, and wanting to use one of my own designs, I chose this pattern because I’ve received a lot of positive feedback on this design in the relatively short time it’s been out and it’s a pretty quick design to stitch up. I started it on Saturday night and finished it on Sunday night –actually very early Monday morning.

I like to use colors that are a little less traditional when I make baby blankets.  I used 1 skein each Red Heart Soft in #2515 Turquoise, #4601 Off White, #9623 Spearmint, and Red Heart Soft Baby Steps #9505 Aqua.  I just worked 4 rows of the pattern in each color.

Image

I really like how the colors worked together for the remake. I hope the recipient likes it as much as I do!

You can get the free pattern for this baby blanket from the Crochet 1-2-3 website HERE.

Free Pattern – Champlain One Skein Neck Scarf

I made this scarf with one ball of Naturally Caron.com Country, but it could be made with any worsted weight yarn.  The softer the yarn, the happier you will be with the result.  A couple of great and inexpensive options would be Premier Everyday Soft or Red Heart Soft.

Champlain One Skein Neck WrapImage

designed by Carrie Carpenter

SKILL LEVEL: Easy

FINISHED MEASUREMENTS: Neck wrap measures approximately 5″/12.5cm wide x 42″/106.5cm

YARN:  Naturally Caron.com Country (75% Microdenier Acrylic/25% Merino Wool; 3 oz/85g, 185yds/169m skein): 3 oz

Shown in: #0014 Deep Purple

CROCHET HOOK:  One size US I-9 (5.5 mm), or size to obtain gauge.

ADDITIONAL MATERIALS:  1 shank button—1-1 1/2″/25-38mm long, Yarn needle

GAUGE:  In pattern, 2 pattern repeats and 6 rows = 4″/10cm.

Note: 1 pattern repeat consists of 1 shell and 1 X-st.

STITCHES USED:  Chain (ch), double crochet (dc), single crochet (sc)

SPECIAL STITCHES:

shell: (Dc, ch 1, dc, ch 1, dc) in indicated stitch or space.

X-st: Cross stitch—Dc in indicated stitch or space, ch 3, working around dc just made, dc in skipped stitch or space indicated.

DIRECTIONS:     

Ch 27.

Row 1: (Dc, ch 1, dc, ch 1, dc) in 6th ch from hook (shell made), *sk next 4 ch, dc in next ch, ch 3, working around dc just made, dc in last skipped ch (X-st made), sk next 3 ch, shell in next ch; repeat from * across to last 3 ch, sk next 2 ch, dc in last ch, turn—2 1/2 pattern repeats.

Row 2: Ch 3 (counts as first dc here and throughout), sk next ch-1 sp, dc in next ch-1 sp, ch 3, working around dc just made, dc in last skipped ch-1 sp (X-st made), *shell in next ch-3 sp, X-st over next 2 ch-1 sps; repeat from * across, dc in top of turning ch, turn.

Row 3: Ch 3, shell in first ch-3 sp, *X-st over next 2 ch-1 sps, shell in next ch-3 sp; repeat from * across, dc in top of turning ch, turn.

Rows 4–59: Repeat last 2 rows 28 times.

Edging Row: Ch 3, 3 dc in first st, sc in next 2 sts, 4 dc in next st, [sc in next 3 sts, 4 dc in next st] 5 times, sc in next 2 sts, 4 dc in top of turning ch—eight 4-dc groups. Fasten off.

Foundation Edging Row: Working across bottom side of foundation ch, join yarn in first ch, ch 3, 3 dc in same ch, sc in next ch, [sc in next 2 ch, 4 dc in next ch] 6 times, sc in next 3 ch, 4 dc in next ch—eight 4-dc groups. Fasten off.


FINISHING:  Using yarn needle, weave in all ends. Measure 10″/25.5cm up from one end, sew button centered on wrap. Block lightly, if desired.

Image

Free Pattern – Dewdrops Baby Blanket

Here is another one of my patterns that has been offered as a free pattern on Naturally Caron’s website. I’ll work at listing my other Naturally Caron patterns here over the next few weeks since Caron has pulled all of their Naturally Caron free patterns.

The Dewdrops Baby Blanket was made in Naturally Caron Joy! yarn, but can make it in any worsted weight yarn.


Dewdrops Baby Blanket

designed by Carrie CarpenterImage


SKILL LEVEL: Easy

TECHNIQUE USED: Crochet

FINISHED MEASUREMENTS: Blanket measures approximately 34″/86.5cm wide x 34″/86.5cm long, including border

YARN: Naturally Caron.com JOY! (70% Acrylic/30% Bamboo; 2.5oz/70.8g, 138yds/127m):

#0001 Snow (A): 4 balls;  #0004 Kiwi (B): 2 balls; and #0002 Cerise (C): 2 balls

CROCHET HOOK: One size US J-10 (6mm), or size to obtain gauge;  One size US I-9 (5.5mm) (for border only)

GAUGE:  In pattern, 5 pattern repeats = 8″/20.5cm, and 8 rows = 4″/10cm.  Gauge is not critical for this project.

STITCHES USED: Chain (ch), double crochet (dc), slip stitch (sl st)


NOTE: To change color, work last stitch of old color to last yarn over. Yarn over with new color and draw through all loops on hook to complete stitch. Proceed with new color. Fasten off old color.


BLANKET

With larger hook and A, ch 122.

Row 1: Sc in 2nd ch from hook, sk next 2 ch, 5 dc in next ch, sk next 2 ch, sc in next ch, *sk next 2 ch, 5 dc in next ch, sk next 2 ch, sc in next ch; repeat from * across; change to B in last st, turn—Twenty 5-dc shells.

Row 2: With B, ch 3 (counts as first dc here and throughout), 2 dc in first sc, sk next 2 dc, sc in next dc (center dc of 5-dc shell), sk next 2 dc, *5 dc in next sc, sk next 2 dc, sc in next dc, sk next 2 dc; repeat from * across to last sc, 3 dc in last sc; change to A in last st, turn—Nineteen 5-dc shells and one 3-dc half-­shell at each end.

Row 3: With A, ch 1, sc in first dc, sk next 2 dc, 5 dc in next sc, sk next 2 dc, *sc in next dc (center dc of 5-dc shell), sk next 2 dc, 5 dc in next sc, sk next 2 dc; repeat from * across to turning ch, sc in top of turning ch; change to C in last st, turn.

Row 4: With C, repeat Row 2; change to A in last st.

Row 5: With A, repeat Row 3; change to B in last st.

Row 6: With B, repeat Row 2; change to A in last st.

Row 7: With A, repeat Row 3; change to C in last st.

Rows 8–63: Repeat Rows 4–7 fourteen times; do not change color at the end of Row 63. Do not fasten off A.


FINISHING

Border: Change to smaller hook.

Round 1: With A, work sc evenly spaced around all edges of blanket, working 3 sc in each corner; join with sl st in first sc.

Round 2: Ch 1, sc in each sc around, working 3 sc in each corner; join with sl st in first sc.

Round 3: Ch 1, sc in same st as join, *ch 2, sk next sc, sc in next sc; repeat from * around, ch 2; join with sl st in first sc.

Using yarn needle, weave in all ends. Block lightly, if desired.

 Image